Overview
In the last tutorial, we created a RESTful Web Service CRUD Operations with Spring Boot. In this tutorial, we show you how to secure RESTful Web Service with Spring Boot Security and Basic Authentication.Follow the steps mentioned below to build this application.
Watch tutorials
Environment Setup
- Eclipse Oxygen and Install Spring Tool Suite for Eclipse IDE
- Spring Boot v2.0.1.RELEASE
- spring-boot-starter-web
- spring-boot-starter-security
- Java 1.8+
- Postman
Project Structure
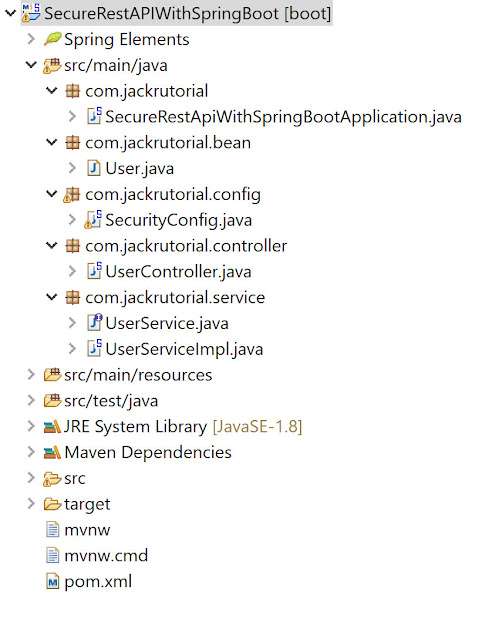
The following screenshot shows final Structure of the Spring Boot Project.Creating RESTFul Webservice with Spring Boot
Launch Eclipse IDE. Go to File -> New -> Other... Select Spring Starter Project under Spring Boot category then click Next as shown below
In the next screen, you enter the content as shown below then click Next
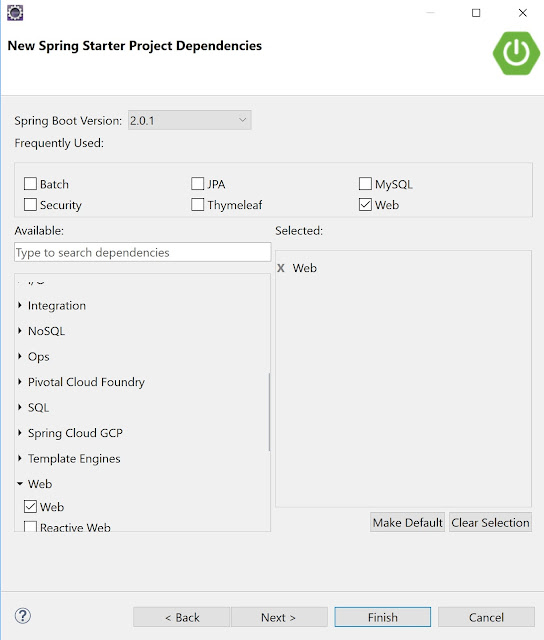
In the next step, you choose Spring Boot Version is 2.0.1 and choose the Web, then click Finish.
Maven Dependencies
We will add the dependencies spring-boot-starter-security to pom.xml file<dependency> <groupId>org.springframework.boot</groupId> <artifactId>spring-boot-starter-security</artifactId> </dependency>The updated pom.xml file will have the following contents
<?xml version="1.0" encoding="UTF-8"?>
<project xmlns="http://maven.apache.org/POM/4.0.0" xmlns:xsi="http://www.w3.org/2001/XMLSchema-instance"
xsi:schemaLocation="http://maven.apache.org/POM/4.0.0 http://maven.apache.org/xsd/maven-4.0.0.xsd">
<modelVersion>4.0.0</modelVersion>
<groupId>com.jackrutorial</groupId>
<artifactId>SecureRestAPIWithSpringBoot</artifactId>
<version>0.0.1-SNAPSHOT</version>
<packaging>jar</packaging>
<name>SecureRestAPIWithSpringBoot</name>
<description>Demo project for Spring Boot</description>
<parent>
<groupId>org.springframework.boot</groupId>
<artifactId>spring-boot-starter-parent</artifactId>
<version>2.0.1.RELEASE</version>
<relativePath/> <!-- lookup parent from repository -->
</parent>
<properties>
<project.build.sourceEncoding>UTF-8</project.build.sourceEncoding>
<project.reporting.outputEncoding>UTF-8</project.reporting.outputEncoding>
<java.version>1.8</java.version>
</properties>
<dependencies>
<dependency>
<groupId>org.springframework.boot</groupId>
<artifactId>spring-boot-starter-web</artifactId>
</dependency>
<dependency>
 <groupId>org.springframework.boot</groupId>
 <artifactId>spring-boot-starter-security</artifactId>
</dependency>
<dependency>
<groupId>org.springframework.boot</groupId>
<artifactId>spring-boot-starter-test</artifactId>
<scope>test</scope>
</dependency>
</dependencies>
<build>
<plugins>
<plugin>
<groupId>org.springframework.boot</groupId>
<artifactId>spring-boot-maven-plugin</artifactId>
</plugin>
</plugins>
</build>
</project>
Creating Model Layer
Create a User class under com.jackrutorial.bean and write the following code in it.package com.jackrutorial.bean;
public class User {
private int id;
private String fullName;
private String email;
public User() {
super();
}
public User(int id, String fullName, String email) {
super();
this.id = id;
this.fullName = fullName;
this.email = email;
}
public int getId() {
return id;
}
public void setId(int id) {
this.id = id;
}
public String getFullName() {
return fullName;
}
public void setFullName(String fullName) {
this.fullName = fullName;
}
public String getEmail() {
return email;
}
public void setEmail(String email) {
this.email = email;
}
}
User Service Layer
Create a UserService interface under com.jackrutorial.service and write the following code in it.package com.jackrutorial.service;
import java.util.List;
import com.jackrutorial.bean.User;
public interface UserService {
public List<User> getAllUser();
public User getUserById(int id);
}
Create a UserServiceImpl class implements UserService Interface under com.jackrutorial.service package and write the following code in it.package com.jackrutorial.service;
import java.util.ArrayList;
import java.util.List;
import org.springframework.stereotype.Component;
import com.jackrutorial.bean.User;
@Component
public class UserServiceImpl implements UserService {
private static List<User> users = new ArrayList<>();
static {
User admin = new User(1, "Admin", "admin@jackrutorial.com");
User support = new User(2, "Support", "support@jackrutorial.com");
User test = new User(3, "Test", "test@jackrutorial.com");
users.add(admin);
users.add(support);
users.add(test);
}
@Override
public List<User> getAllUser() {
return users;
}
@Override
public User getUserById(int id) {
for(User user : users) {
if(user.getId() == id) {
return user;
}
}
return null;
}
}
Rest Controller Configuration
Create a UserController class under com.jackrutorial.controller package and write the following code in it.package com.jackrutorial.controller;
import java.util.List;
import org.springframework.beans.factory.annotation.Autowired;
import org.springframework.web.bind.annotation.GetMapping;
import org.springframework.web.bind.annotation.PathVariable;
import org.springframework.web.bind.annotation.RestController;
import com.jackrutorial.bean.User;
import com.jackrutorial.service.UserServiceImpl;
@RestController
public class UserController {
@Autowired
private UserServiceImpl userService;
@GetMapping("/user/")
public List<User> getAllUser(){
return userService.getAllUser();
}
@GetMapping("/user/{userId}")
public User getUser(@PathVariable int userId) {
return userService.getUserById(userId);
}
}
Spring Security Configuration
SecurityConfig.java class is annotated with @EnableWebSecurity to enable Spring Security Web Security support, and extended WebSecurityConfigurerAdapter abstract. In this tutorial, every request to be authenticated using HTTP Basic Authentication.
Create a SecurityConfig class under com.jackrutorial.config package and write the following code in it.
package com.jackrutorial.config;

import org.springframework.context.annotation.Bean;
import org.springframework.security.config.annotation.web.builders.HttpSecurity;
import org.springframework.security.config.annotation.web.configuration.EnableWebSecurity;
import org.springframework.security.config.annotation.web.configuration.WebSecurityConfigurerAdapter;
import org.springframework.security.core.userdetails.User;
import org.springframework.security.core.userdetails.UserDetails;
import org.springframework.security.core.userdetails.UserDetailsService;
import org.springframework.security.provisioning.InMemoryUserDetailsManager;

@EnableWebSecurity
public class SecurityConfig extends WebSecurityConfigurerAdapter {

 @Bean
 @Override
 public UserDetailsService userDetailsService() {
  UserDetails user = User.withDefaultPasswordEncoder()
    .username("admin")
    .password("123")
    .roles("ADMIN")
    .build();
  return new InMemoryUserDetailsManager(user);
 }

 @Override
 protected void configure(HttpSecurity http) throws Exception {
  http.httpBasic().and().authorizeRequests()
   .antMatchers("/user/**").hasRole("ADMIN")
   .and().csrf().disable().headers().frameOptions().disable();
 }
}
Build and Deploy Application
Right click to the Project and follow the below steps:select Run As -> Maven clean.
select Run As -> Maven install.
select Run As -> Spring Boot App.
INFO 7460 --- [           main] o.s.b.w.embedded.tomcat.TomcatWebServer  : Tomcat started on port(s): 8080 (http) with context path ''
INFO 7460 --- [           main] j.SecureRestApiWithSpringBootApplication : Started SecureRestApiWithSpringBootApplication in 3.096 seconds (JVM running for 4.542)
Test Spring Boot Restful Web Services using Postman
- Launch postman
- Select GET for the method
- Insert the endpoint into the box next to GET: http://localhost:8080/user/
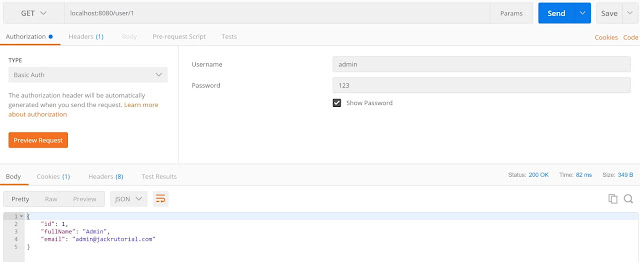
- Select Basic Auth for the Authorization type
- Enter username/password as admin/123
- Click Send.
The response of GET Request (http://localhost:8080/user/1) as below


